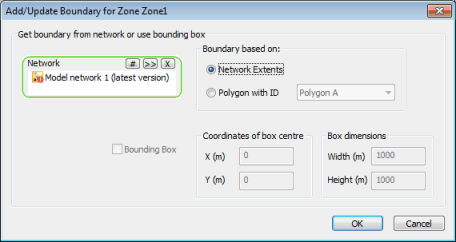
Add / Update GeoExplorer Zone Boundary Dialog
This dialog is used when adding a GeoExplorer zone, or updating an existing GeoExplorer zone, from a network or by defining a bounding box.
See Updating GeoExplorer Zone Boundaries for details.
The dialog is displayed when:
- A Asset Group, Network or Workspace is dragged onto the GeoExplorer window
- The Update Zone Boundary menu item is selected from the GeoExplorer zone grid window. (Right click in a cell in the grid window of the zone to be updated to display the menu.)
To update a zone boundary using a Network, use drag and drop or the
 button to add a Network to the selection box.
- Select the option to be used for creating the boundary:
- Network Extents: a zone boundary will be created based on the outermost network node locations.
- Polygon with ID: select a network polygon from the dropdown list. A zone boundary will be created based on the network polygon boundary.
- Click OK to update the zone boundary.
To define a bounding box as the zone boundary, check the Bounding Box option:
- Define the coordinates and dimensions of the bounding box.
- Click OK to update the zone boundary according to the defined parameters.

If a network is used to update an existing zone by dragging the network item to the GeoExplorer window, the Bounding Box options will not be available on the dialog.

