|
Section
|
Description
|
|
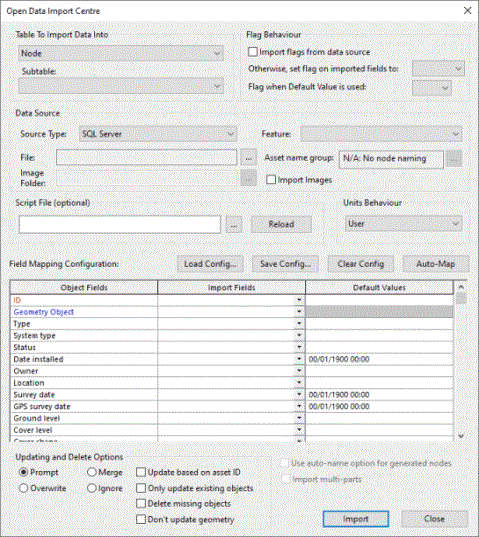
Table to Import Data Into
|
Choose the database table into which you want to import data. You can
only import data one table at a time.
|
| Subtable |
Used to import subtable / array data (e.g. hyperlinks) for the database table selected in the Table to Import Data Into field above. Select the desired subtable / array in the Subtable combo box. Leave this field blank to import data into the main table. |
|
Flag Behaviour
|
Select the flags to be set on imported data:
|
Option
|
Description
|
|
Import flags from data source
|
If checked, an additional Flag Fields column is displayed
in the Assignment Grid. This allows flag fields
in the external data to be mapped onto flag fields in the selected table.
|
|
Otherwise, set flag on imported fields to:
|
Select a flag from the list. The flag will be applied to all
fields imported from the selected Data Source,
that can be flagged. If Import flags from data source is checked, the flag will only be applied to imported fields
that do not have an imported flag.
|
|
Flag when Default Value is used:
|
Select a flag from the list to apply that flag to all fields
in which the value has been set from the Default
Values column of the Assignment Grid.
|
|
|
Data Source
|
Select the type of data you want to import here. Once you have done
so, you will need to enter other information, such as a filename, or GeoPlan
layer name. You may also need to choose a data type or database table
containing the data you want to import.
|
Field
|
Description
|
|
Source Type
|
Choose the type of data to import from the list. Only valid
data types are listed.
(See the Open Data Import Centre topic for data type details.)
|
|
File
|
For certain types of data you will need to specify a filename. Click
Browse to find the file.
When importing from an Oracle database, this displays the Select
Oracle Data dialog.
When importing from an SQL Server database, this displays the Select
SQL Server Data dialog.
|
|
Image Folder
|
Specify the folder in which images and other attachments to be imported are located. Click
Browse to find the file.
To enable this field select the Import Images option.
See Importing Attachments for further details on how to use this option.
|
|
Feature
|
For certain types of data you will need to specify the feature. Select
the feature from the list:
- When importing from an Oracle database, only tables for which the user
has been granted the appropriate read permissions in Oracle will be available
for selection.
- When importing from an Access database, queries as well as tables will be available for selection.
|
| Asset name group |
When importing node or pipe data, Asset Name Group data can be automatically generated.
See the Open Data Import Centre - Advanced Features topic for details on using this option.
|
|
|
Script File (optional)
|
You can use a script to control the import process more precisely. Use
this box to browse for the script file.

Note
Scripts are an advanced feature and not recommended
for anyone without experience of programming in a scripting language.
To help you with writing your own scripts, you can use Reload to load the latest version of your selected script after making
changes in an external editor such as Notepad. This allows you to adjust
the script and test the changes without closing and re-opening the dialog.
Contact Innovyze for further information on using a script to control import.
|
|
Units Behaviour
|
Use the options in this dropdown list to specify how units are handled
during the import process. The options are:
- InfoAsset Manager - the external
data uses InfoAsset Manager Native units.
- User - the external data
uses the currently defined User Units for the network.
- Custom - you can set the
units used for each field in the imported data yourself. When you select
Custom, an extra Units column is added to the Assignment Grid. Select
the correct units from the options in the list for
each field.
|
|
Assignment Grid
|
Use this grid to define exactly how the external data should be imported into fields in the database.
|
Column
|
Description
|
|
Object Fields
|
This column lists all the fields for the current InfoAsset Manager object
type, as selected in the Select Table to Import into box.
Any field shown in red type is required for import. You must map at
least these required fields.
You cannot change any of the fields in this column.
|
|
Import Fields
|
This column allows you to map fields in the external data to the InfoAsset Managerfields listed in the Object Fields column.
- You can map the fields manually by choosing an
external field in the dropdown list for each InfoAsset Manager field in the
Object Fields column. You must map the required
fields before you can import data
- You can try to map fields automatically. Click
the Auto-Map Fields button. InfoAsset Manager will
attempt to map the fields. The mapping is based on the names used for
fields when data is exported to GIS from InfoAsset Manager.
- When importing data from an Oracle database, to
import spatial data, map the Oracle spatial data field to the Geometry
Object field (highlighted in blue) in the Object
Fields column.
|
|
Default Values
|
This column allows you to set values of fields directly as well as from
external data.
On import:
- If an external data fields has not been mapped,
the field for which the default value has been set will be assigned the
value entered in the Default Values column.
- If both an external data field has been mapped
and a default value has been entered, the external data will be used where
available. Where the external data contains a Null value or a blank, the
default value will be used instead.
|
|
Flag Fields
|
This column is only displayed if Import
Flags from GIS is checked.
Cells in this column are greyed out for data that cannot have a flag.
|
|
Units
|
This column is only displayed if you have chosen the Custom option for units behaviour.
Choose the units for each field in the dropdown lists. Fields which
do not require units information are greyed out.
|
|
|
Updating and Delete Options
|
The updating options allow you to decide how to handle duplicate objects
in the external data.
The action to be followed by InfoAsset Manager when it encounters an object
in the external data with the same name as an object already in the model
is set by the following options:
|
Option
|
Description
|
|
Prompt
|
You will be asked if you want to overwrite the current object or not
every time a duplicate object is found in the external data
|
|
Merge
|
Fill in any blank fields in the existing object with data from the imported
object. Do not change any existing data
|
|
Overwrite
|
Replace data in the existing object with data from the imported object.
(If the imported object does not contain data for a field, the existing
data in that field will not be changed.)
|
|
Ignore
|
Ignore the imported object if it is a duplicate
|
Note
When importing arrays e.g. CCTV
Survey: Details data, existing array data will be overwritten unless
the Merge option is selected, in which case data
will be appended to the existing array.
Further update and delete options can be selected from the following:
|
Option
|
Description
|
|
Update Based on Asset ID
|
If checked, InfoAsset Manager will look for duplicate objects
using the Asset ID field and not the usual
object identifier.
Collection Network Warning
When updating Collection Network pipe objects using Object
ID, the Link Suffix field of the object is
used (in addition to the connected node IDs), to check for duplicate pipes.
If connected node IDs match those of an existing pipe, but a link
suffix is not provided, the Open Data Import Centre will create a new
pipe object by incrementing the link suffix.
Similarly for Manhole Survey objects, if a Survey
Index is not provided, new objects will be created by incrementing
the survey index.
When importing pipe name group data to a Collection Network, if a matching pipe asset ID is found, the US node ID, DS node ID and Link suffix values of the pipe name group entry will be automatically populated on import. If a matching asset ID is not found, an error will be displayed in the import log.
For any imported pipes which do not have a US node ID or DS node ID attribute, InfoAsset Manager will attempt to find a node within a bounding box search (the corners of which are left 0.1m, right 0.1m, top 0.1m, bottom 0.1m), where the centre of the box is the X,Y coordinate of the end of the pipe. If it finds an existing node, InfoAsset Manager will set this existing node as either the pipe’s US node ID or DS node ID (depending on the pipe's direction when it was digitised). Note that this may result in the end of the pipe being moved slightly as it is snapped to the coordinates of the node.
If no existing node is found, InfoAsset Manager will create a node at the end of the pipe (and also set its ID in the pipe’s connectivity fields) and give the first of these newly created nodes the ID 'xxxx000000001', the next 'xxxx000000002' and so on.
|
|
Only update existing objects
|
If checked, InfoAsset Manager will only update existing objects.
No new objects will be created on import.
|
|
Delete missing objects
|
If checked, InfoAsset Manager will search for missing objects
of the relevant type and delete them at the end of the import process.
(A missing object is an object that is in the InfoAsset Manager Table
to Import Data Into but is NOT in the external Data
source table.)
If Update Based on Asset ID is checked,
the Asset ID field will be used to search
for missing objects and not the usual object identifier.
All missing objects found will be listed and a prompt for confirmation
of deletion will be displayed before any objects are deleted.
|
| Don't update geometry |
Check this box when you are updating ArcGIS, Oracle, or SQL Server.
If checked, existing objects will not have their geometry changed, even if the geometry has changed in the imported GIS data.
|
|
|
Use auto-name option for generated nodes
|
If checked, the Automatic
Node Name Generation functionality will be used for naming nodes that are generated
when importing disconnected links. (See Open
Data Import Centre - Advanced Features for more information.)
This option will only be enabled when automatic naming is switched on
and an object for which nodes may be generated has been selected from
the Table to Import Data Into section.
|
| Import multi-parts |
The Open Data Import Centre provides limited support for the import of polygons with multi-parts and complex shapes.
The Import multi-parts polygon option is only enabled when a polygon type table is selected and the data source selected is a GIS layer (from a file or from the GeoPlan).
Polygons will be imported in the following way:
|

GIS multi-part polygon
|
|

Do not import multi-parts: Imported as one polygon
|
|
Import multi-parts: Imported as three separate polygons
|
|

GIS polygon with hole
|
|

Do not import multi-parts: Imported as one polygon
|
|

Import multi-parts: Imported as polygon with umbilical cord between two shapes
|
When importing multi-part polygons, the ID and Area of the polygons will be generated automatically, regardless of the mappings entered in the Assignment Grid.
A maximum of 10 fields may be mapped in the Assignment grid when using the Import multi-parts option.
|
|
Buttons
|
|
Button
|
Description
|
|
Load Config
|
Load in a previously saved configuration (CFG) file. The file only contains
details of the settings in the Assignment Grid.
You need to set the other options on the dialog, such as the Select
Table to Import into field, to match those used when the configuration
file was saved.
|
|
Save Config
|
You can save all the settings in the Assignment Grid to a file (suffix CFG). These settings can then be reused for future imports.
|
|
Clear Config
|
Clears all previous field mappings.
|
|
Auto-Map
|
Automatically attempt to map fields in the external
data to fields in the database. Make sure you have chosen the appropriate
table in the Select Table to Import into box before
using this button.
InfoAsset Manager uses the standard field names used when exporting from
InfoAsset Manager to try to link the fields up.
|
|
Import
|
Import data based on the current settings.
|
|
Close
|
Quit the importer.
|
|