Importing Time Varying Data
Time Varying Data can be imported from the following formats:
- Non-CSV Data:
- HydroWorks format (.red, .hyv, .hyq, .lev)
- Flow Survey .fdv format
- CSV Data
Importing Non-CSV Data
Time varying data can be imported from HydroWorks format (.red, .hyv, .hyq, .lev) or from Flow Survey .fdv format:
- Right-click on a Asset Group in the Explorer Window and select Import | Time varying data...| Time-varying data from the popup menu.
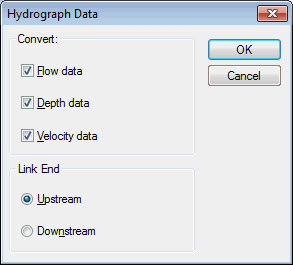
- In the Select Files dialog, select the files to be imported (multiple files may be selected) and click Open. The Hydrograph Data Dialog is displayed.
- in this dialog:
- Select the types of data to be imported by selecting the relevant check boxes. (Note that flow, depth and velocity data will only be available for selection if the selected files include the appropriate type of data.)
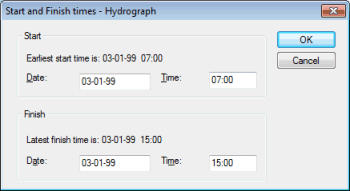
- Click OK. The Start and Finish Times dialog will be displayed.
- The Start and Finish Times dialog displays the earliest start time and latest finish time from the data selected for import. The times can be manually adjusted, but only within the times originally displayed. Click OK to add the Time Varying Data to the database.
A different Time Varying Data is created for each type of data imported. These are given default names (Depth, Flow etc.) which may be changed.
Importing CSV Data
Time Varying Data stored in CSV files can be imported to InfoAsset Manager.
Data can either be imported to a new TVD object or appended to an existing TVD object:
- To create a new TVD object, right click on a TVD group and select the CSV import option.
- To append data to an existing TVD object, right click on the TVD object and select the CSV import option.
- Data can only be appended if it is of the same event type as the existing event.
- Data will be appended as a sub event. If the start time of the data being imported overlaps the existing data, the choice of overwriting the existing data will be given.
- Right-click on a Time Varying Data Asset Group or Time Varying Data Item in the Explorer Window and select Import | from generic CSV file from the popup menu. A standard Windows Open dialog is displayed.
- Select the files to be imported (multiple files may be selected) and click Open.
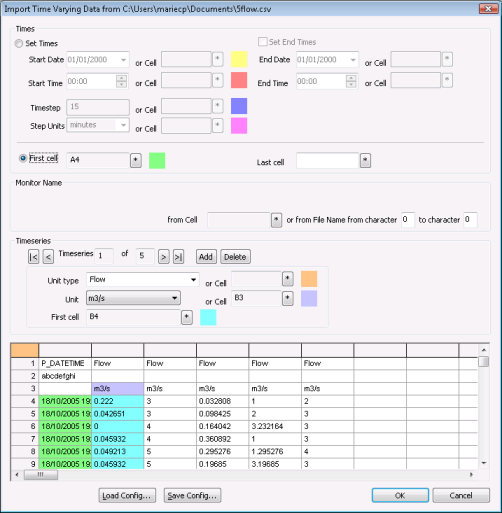
- The Import Time Varying Data from CSV Dialog is displayed.
- Set the import parameters on the import dialog. Values can be entered directly or read from the file to be imported. To read a value from the file, click on a cell in the grid at the bottom of the dialog and then on the * button.
- Times: specify the time range of data to be imported:
- If the file is a standard logger format file, the Set Times and Timeseries unit information should automatically be set up from the header information in the CSV file.
- If the file contains a date-time column, use the First Cell and Last Cell fields to enter the cells defining the time range of data to be imported.
- If there is no date and time information, specify start and end times and a timestep interval.
- Monitor Name: specification of a monitor name is optional. The monitor name will be applied as the event profile ID (link label or node reference).
- To read the monitor name from the file, select the cell in the grid at the bottom of the dialog containing the monitor name and click on the * button.
- To derive the monitor name from the name of the file to be imported, enter the range of characters in the file name to be used. (For example, when importing a file named Monitor1_001, enter from character of 8 and to character of 12 to import a monitor name of 1_001.)
- Timeseries: set the parameters for each time series in the file. For each timeseries (column of data) to be imported a Unit Type and Unit must be defined. The Add and Delete buttons can be used to include and exclude timeseries from import. The underlying data will not be changed.
- Click OK to complete the import. A Time Varying Data object will be created for each data series imported.
(Specification of an end time is optional; if no end time is specified all data from the first cell to the end of the timeseries will be imported.)
Saving Configurations
The settings for commonly used file types can be saved. Set up import parameters on the dialog, and then use the Save Config button to save them to a file. The Load Config button can then be used to open an existing configuration.


