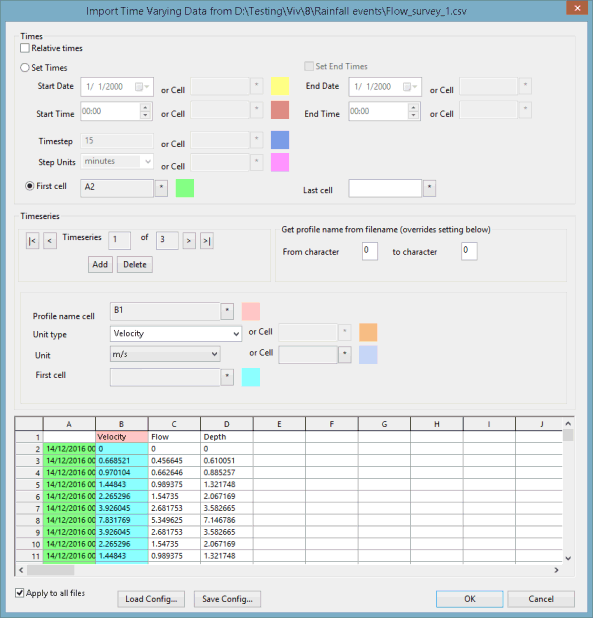
Import Time Varying Data from CSV Dialog
This dialog is a generic importer for time varying data. You can identify a column containing time information, or set a start time and timestep for the data. For each column of time varying data a unit type can be set.
The dialog is displayed if you right-click a:
- Flow Survey or Flow Survey Event and choose Import | from generic CSV file from the popup menu. See Importing Flow Surveys for further details.
- Model Group and choose either Import | Rainfall event | from generic CSV file or Import | Rainfall event | from multiple generic CSV files into one event from the popup menu. See Importing and Exporting Rainfall Events for further information.
Dialog description
| Item | Description | ||||||||||
|---|---|---|---|---|---|---|---|---|---|---|---|
| Relative times |
If checked, relative date and times will be used for the imported data. By default, this option is unchecked. The following relative date /time formats are currently permitted:
|
||||||||||
| Set Times |
Used when importing files with no date-time column to specify the time range of data to be imported and the time interval between data values. It is also used to specify timestep and timesep units when using Relative times. The fields can be manually edited by entering data directly. Alternatively, click on a cell in the grid at the bottom of the dialog and then on the * button next to the Cell field to add the current grid cell to the Cell field.
|
||||||||||
| First Cell |
Can be used if the file to be imported contains a date-time column. In the grid at the bottom of the dialog: click on the first cell containing valid date-time information and then on the * button next to the First cell field to add the current grid cell to the First cell field. |
||||||||||
|
Get profile name from file (overrides setting below) |
The full or partial name of the file being imported can be used as the profile ID (link label or node reference) for all data being imported. Select which characters in the filename are to be used for the profile name(s). For example, when importing a file named Monitor1_001, enter From character of 8 and To character of 12 to import the profile name of 1_001. To use the full file name then specify a From character of 1 and a To character of 12 |
||||||||||
| Add / Delete |
Use the Timeseries section to view and edit parameters for each data series in the file, which are displayed in the grid at the bottom of the dialog. Use the arrow buttons to scroll between each data series. Data series can be added or deleted for import purposes (the underlying file will not be edited). |
||||||||||
| Data Series parameters |
Describes the data type of the currently viewed data series and the location in the file where the data starts.
|
||||||||||
| Grid Window | The file being imported is displayed in the grid window. | ||||||||||
| Apply to all files |
Applies the current dialog settings to all files when importing a selection of multiple files. If this option is unchecked, the import dialog will be displayed before the import of each file. 
Note
When importing rainfall events, this option is only available if you have chosen the Import | Rainfall event | from multiple generic CSV files into one event option from the popup menu. |
||||||||||
| Load Config |
Loads previously saved settings from a .cfg file. |
||||||||||
| Save Config |
Saves the current dialog settings to a configuration (.cfg) file. |

