Widgets
Widgets are graphical components that can be added to dashboards. This topic covers all the operations that can be done with widgets.
- Open the dashboard in design mode.
- Click on the Add button.
- The Add Dashboard Widget dialog is displayed.
- Type in a name for the widget.
- Select a widget type in the Type dropdown list.
- Click on OK. The dialog closes. The widget has been added to the dashboard design view.
- Configure the widget by dragging and dropping one or more networks and an SQL query onto the relevant drop targets of the Common Widget Properties area (please refer to the Dashboard Design View topic for details of each of the areas making the view up).
- Configure the widget further by setting its properties in the Widget-Specific Properties area.
- Click on the Save button at the bottom of the design view.
- If required, add more widgets by repeating steps 2 to 9.
- Once finished, click on the Update and View button. This will launch the dashboard in normal view, with the latest saved widget configuration.
- Open the dashboard in design mode
- Select the widget to edit in the Dashboard Properties area by clicking on it.
- Edit widget data as appropriate in the Common Widget Properties area or the Widget-Specific Properties area (please refer to the Dashboard Design View topic for details of each of the areas making the view up).
- Once finished, on the Save button at the bottom of the design view to save your changes.
- If required, repeat steps 2 to 4 for any other widget you want to edit.
- If required, click on the Update and View button. This will launch the dashboard in normal view, with the latest saved widget configuration.
- Open the dashboard in design mode
- Select the widget to re-order in the Dashboard Properties area.
- Click on the Up or Down button at the bottom of the dialog as many times as you need to move the widget by.
- The widget is moved to its new place within the list.
- Click on Save. to commit your changes.
- If required, repeat steps 2 to 5 if you want to re-order any further widgets.
- If required, click on the Update and View button. This will launch the dashboard in normal view, with the latest saved widget configuration.
- Open the dashboard in design mode
- Select the widget to delete in the Dashboard Properties area.
- Click on the Del button at the bottom of the dialog to delete the selected widget.
- The widget disappears from the list of widgets..
- Click on Save. to commit your changes.
- If required, repeat steps 2 to 5 if you want to delete any further widgets.
- If required, click on the Update and View button. This will launch the dashboard in normal view, with the latest saved widget configuration.
Illustrative examples are provided below.
Smoke Test Backlog
select count(*) as [Count] from [Smoke Test] where date_planned < '14/01/2011' and completed = false
Background colour for values greater than set to 2 and red.

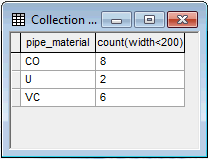
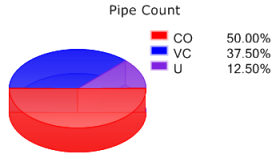
Count and Group Small Pipes by Material type
SELECT count (width < 200) GROUP BY pipe_material

Slice per row and 3D options selected.

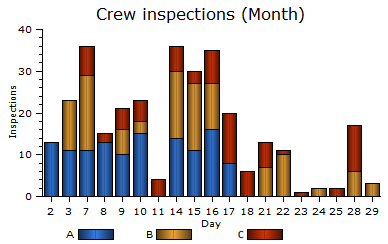
Crew Inspections for the month of June 2010
SELECT count(*) as [Num Insp] from [Manhole Survey]
where team_leader is not null and yearmonthpart(date_completed) = '2010/06'
group by
team_leader as [Team Leader] ,
daypart(date_completed) as [Day] order by daypart(date_completed)

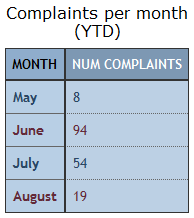
Complaints per Month for a few months in 2010
select count(*) as [Num Complaints] from [Customer Complaint] where yearpart(date_reported) = 2010
group by
monthname(date_reported) as [Month] order by date_reported;

