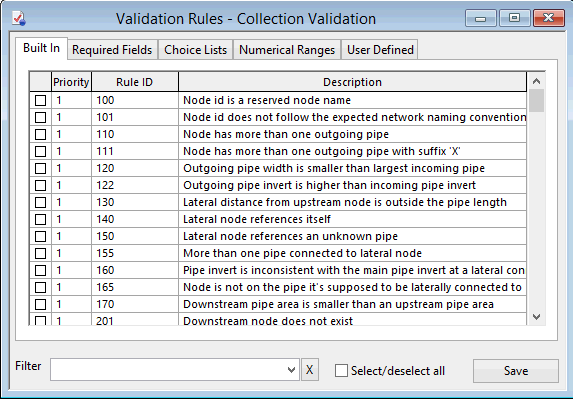
Validation Editor
The Validation Editor is used to view and edit the parameters for a Validation object. The editor is used to control all aspects of network validation, allowing selection of which rules are to be applied and the values to be used when applying those rules.
Different validation objects are used for Collection, Distribution and Asset Networks. Any number of validation data items can be created, allowing different validation settings for different networks, or for different types of data checking.
A validation object can be set as the default validation object for a particular network via the Default Validation Rules Dialog. The default validation object will automatically be opened when the network is opened.
A validation object can also be specified as the validation object to be used during a commit operation via the Pre-commit Validations Dialog.
To open a Validation object for editing, either drag the object from the Explorer Window into the main window background, or right click on the object and choose Open from the popup menu.
Editing Parameters in the Validation Editor
The Validation Editor is divided into five pages, each covering a different set of validation rules.
On each page the priority of the rule can be set in the Priority column. The priorities are:
- Priority 1 -
 Error
Error - Priority 2 -
 Warning
 - Priority 3 -
 Information
The priority will be displayed in the Output Window when validation is carried out.
Click the Select/deselect all toggle button to switch on or off all the rules on the current page of the editor.
The Filter field can be used to limit the rules displayed on the page to those that match the specified filter. Any text can be entered into the Filter field, making it much easier to locate a particular validation rule. Alternatively, the filter can be selected from a pre-defined list of standards, currently consisting of the PACP, MACP and MSCC options for a Collection network, helping to ensure that required parameters are validated before, for example, the data is exported.
To remove a filter, simply delete its name from the Filter field.
Further information about each page in the editor is provided below.
Built In Rules Page
The Built In rules page lists rules built in to the software. Use the check box to the left of the row to switch rules on or off.
Further details on each rule can be found in the Built In Validation Rules (Collection), Built In Validation Rules (Distribution) and Built In Validation Rules (Asset) topics.
Required Fields Page
The Required Fields page allows any field for any object type to be marked as being required. Check the box to the left of the row to mark a field as required.
Validation will check that a value has been entered for required fields.
When working with Collection Networks, it is possible to specify Node types to be excluded from validation:
- Click in the Table column of a Node field. An arrow will appear to the right of the cell.
- Click on the arrow to display the Exclude Node Types from Validation dialog.
- In the Exclude Node Types from Validation dialog check the boxes of the node types that are to be excluded from validation and click OK
Choice Lists Page
The Choice Lists page allows validation to be switched on or off for any field for which a choice list is defined. Validation will check that the values in the marked fields correspond with a defined choice for that field.
When working with Collection Networks, it is possible to specify Node types to be excluded from validation:
- Click in the Table column of a Node field. An arrow will appear to the right of the cell.
- Click on the arrow to display the Exclude Node Types from Validation dialog.
- In the Exclude Node Types from Validation dialog check the boxes of the node types that are to be excluded from validation and click OK
Numerical Ranges Page
The Numerical Ranges page allows you to check that values fall within sensible ranges. Use the check box to the left of the row to switch range checking on or off. Different minimum and maximum values may be entered for each range in the Min and Max columns.
User Defined Page
The User Defined page allows user defined validation rules to be created using a simple syntax similar to SQL statements. InfoAsset Manager incudes an editor that allows you to easily build up your own rules without any knowledge of SQL.
To create a new rule, click the Add button. This automatically displays the Validation Rule Editor Dialog. For more information on editing your own rules, see User Defined Validation Rules. To delete a rule, click the Remove button.
Once you have created your user defined rule you can:
- Switch the rule on or off using the check box on the left of the row.
- Edit the rule by clicking on the Edit button on the right of the row. This displays the Validation Rule Editor Dialog.

