Simplifying Object Geometry
The Simplify Geometry tool can be used to correct and thin a selection of polygon and polyline objects.
For polygon objects (including subcatchments), you can also use the tool to ensure that each selected polygon, whose area has changed as a result of thinning, has not exceeded a particular size, and to remove any spurs (regions on the polygon boundary connected to the main polygon by a narrow strip) from polygons.
The Simplify Geometry tool can be accessed by selecting the Geometry | Simplify option from the Model menu.
Thinning and correction
Thinning and correction will work on the following:
- Links
- Subcatchments
- Polygons
- Lines (InfoWorks networks only)
Polygons and polylines are imported into the software from external sources to perform various aspects of model building; these procedures often involve the calculation of intersections.
It is often the case that geometry looks absolutely fine when displayed on paper or on the screen, but it may contain self-intersecting regions, or (nearly) coincident points which will be deleterious to the speed and accuracy of algorithms that will process the geometry.
Cleaning and thinning will remove points that are exceptionally close together, join segments in linear regions, and fix self intersections. The benefit of this is two-fold:
- It greatly increases the accuracy and robustness of intersection calculations.
- Modelling procedures that calculate intersections will be much faster.
It is strongly advised to clean and thin geometry as soon as possible after importing it from an external source.
If the imported geometry is very large and complex, it is highly recommended to follow these two steps in the order described below:
- Thin to remove (nearly) coincident points and to anneal consecutive segments that are nearly co-linear.
- Clean/correct to remove self intersections.
Thinning is used to reduce the number of object vertices, potentially reducing data size significantly, thereby improving performance.
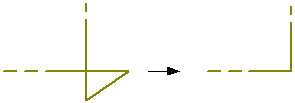
Click on the image below to display an example of thinning.
![]()
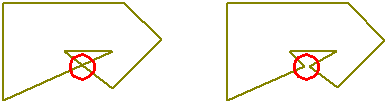
Click on the image below to display some examples of correction of self intersecting polygons and polyline.
![]()

Polygon area constraint and spur removal
For polygon (including subcatchment) objects, you can specify an area constraint to ensure that the polygons are not over-thinned. Any polygon, whose area has changed as a result of thinning, is checked to see that its area does not exceed a specified value. If it does, individual vertices, which were deleted as part of the thinning process, are reinstated until the change in area is within the specified limit.
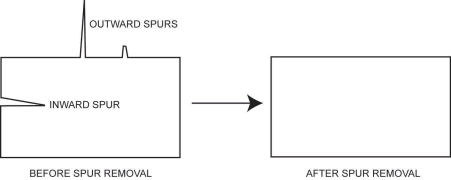
You can further thin the geometry by removing any spurs which are less than a specified width. For each selected polygon, InfoWorks ICM identifies all locations on the boundary where either the distance between two vertices or the perpendicular distance of a vertex to a nearby segment is less than the maximum specified spur width. For each of these locations, the polygon is regarded as being divided into two parts; the part with the smaller area is identified as the spur (to be removed) and the larger part as the main polygon (to be retained).
InfoWorks ICM sorts all spurs in ascending area sequence and attempts to remove each one in turn, subject to any specified polygon area constraint.
The spurs can be inward or outward. Click on the image below to display an example of inward and outward spur removal.
![]()
Simplify Geometry
To carry out simplification of objects:
- Select the objects to be simplified.
- Choose Geometry | Simplify from the Model menu. The Simplify Geometry Dialog is displayed.
- Select required options from the Simplify Geometry dialog:
- Check the Thinning box to remove vertices from selected objects according to the thinning options defined:
- Min segment length - vertices at a distance less than the minimum segment length from another vertex will be removed by the thinning process
- Triangle height - vertices forming a triangle height less than the triangle height specified will be removed by the thinning process.
- Check the Correction box to correct self intersecting objects.
If the object being thinned is a polygon or a subcatchment, then you can also:
- Check the Polygon area constraint box to ensure that each selected polygon, whose area has changed as a result of thinning, has not exceeded a particular size.
The Maximum change in area field is enabled. In this field:
- Specify the size of the polygon, in m², which cannot be exceeded as a result of the thinning operation.
- Check the Spur removal box to ensure that any spurs, whose maximum width is less than the specified width, are removed from the applicable polygons.
The Maximum spur width field is enabled. In this field:
- Specify, in meters, the maximum width of any spurs. Any spurs, which are less than this width are removed.
- Click OK.
Multi-part Polygon
Correction and spur removal of multi-part polygons cannot currently be carried out using the Simplify Geometry functionality in InfoWorks ICM.
If a multi-part polygon is found during the correction or spur removal process, the polygon will be reported as having 'Bad Geometry' in the log. This message indicates that the shape cannot be processed; it does not necessarily mean that the polygon has not been defined correctly. No correction or spur removal will take place, however thinning will be carried out as normal.
Log
An log is produced including correction and thinning results of all selected objects.
The log will also show error messages and warning messages.
Bad Geometry messages are displayed for polygons that could not be processed by the simplification tool. Examples include multi-part polygons (see above), and polygons with zero area.
The log is saved temporarily in the Local Working Folder as an HTML log file. When the log is closed in InfoWorks ICM, the log file in the Local Working Folder will be removed. To view the log at a later date, save the file in the Local Working Folder to another directory and/or under a different name.
