Using property sheets
Property sheets provide a way of looking at all the data for a single network object in a structured way.
Property sheets are displayed in the Object Properties window.
To access a property sheet from the GeoPlan window:
- Click the
 symbol on the Tools tool
bar.
 - Click the node or link you want to edit.
- If there are multiple features displayed at the point at which you clicked, these will be listed. Highlight the appropriate feature and click OK.
- Edit the data in the property sheet area of the Object Properties window.
To access a property sheet from the grid views:
- On the correct grid, double-click the row containing the node or link you want to edit.
To access a property sheet from the Long Section view:
- On the long section plot (not the labels at the bottom of the view, or the schematic at the top) click close to the vertical line representing the node (for node property sheets), or between the lines (for the link property sheet).
Many network object data fields can have additional information recorded using a data flag. This information may include:
- data source
- accuracy, reliability or confidence rating
When editing data on a property sheet, many controls will have an associated flag control. Select the appropriate flag from the dropdown list and both the data and flag controls will be redrawn in the correct colour.
For more details about using flags in your models, see Data flags.
When editing a Date field on a property sheet, click the dropdown arrow to display the Calendar Editor. Select the appropriate date from the calendar.
- Use the arrow buttons on the title bar of the editor to move forwards/backwards by a month.
- Click the month in the title bar of the editor to display a dropdown list of months to choose from.
- Click the year in the title bar of the editor to display controls which allow the year to be edited.
There are additional buttons at the bottom of each network object property sheet:
|
Change Type |
Use this button to change the type of a network object. The button displays the Change Object Type dialog. See Changing network object type for more information. You can change type to any other type of the same object class. In other words, you can change a node into another type of node, but not into a link. |
|
Add Control |
Add control data for the current object. The control data is added to the current control set associated with the current network. If no control set is associated with the network, this button is hidden. If control data already exists for this network object, the button is disabled. |
| OK |
Save changes and close the property sheet. |
| Cancel |
Close the property sheet without saving. All changes will be lost. |
| Apply |
Save changes but do not close the property sheet |
| Help |
Display help on the current page |
Asset History button
If using an Oracle database, a further button is available on all the network property sheets of objects that have an asset ID:
|
|
Use the Asset History button to display an Asset History dialog containing a report of the history of checked in changes for an asset. See Viewing the history of an asset for more details. |
The following section lists the property sheet pages common to more than one type of object.
User Fields page
The User Fields page allows you to view and edit the data that most network objects can store in user defined fields.
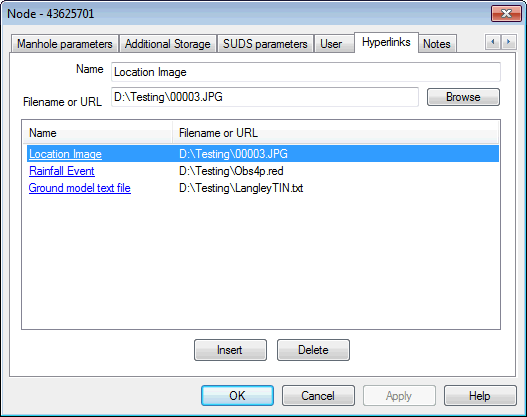
Hyperlinks page
The Hyperlinks page is used to associate external files or internet addresses with objects in the model. These external references are known as hyperlinks.
The types of references that can be included as hyperlinks are:
- files on local or network drives
- internet pages
- links from within internet pages
Add references by:
- drag and drop from Windows File Manager or web browser
- browsing for files on local or network drives
- typing the reference in directly
For full details on using hyperlinks. See the topics in the Associating external files with network objects section. For information specific to the fields on this page, see Hyperlink data fields.
Notes page
Every property sheet has a Notes page where relevant information for the network object can be entered.
The usual Windows text-editing facilities are available when editing notes. Pressing Enter starts a new paragraph. Use Ctrl-C and Ctrl-V for copy and paste.
To move out of the text area, click a button or press the Tab key.
These notes are stored in the network, and separate from notes for any control associated with the object.
Results page
When you have a simulation open, you can display a property sheet in the normal way. The sheet will have an additional Results page displaying a table of summary results for the network object.
This page will be displayed as the front page on the property sheet.
Node Objects
- Node Data Fields
- Fixed Head Node Data Fields
- Transfer Node Data Fields
- Reservoir Data Fields
- Hydrant Data Fields
- Well Data Fields
Link Objects
- Pipe Data Fields
- Open channel data fields
- Valve Data Fields
- Float Valve Data Fields
- Non Return Valve Data Fields
- Meter Data Fields
- Pumping Station Data Fields
- Pump Curve Data Fields
- Valve Curve Data Fields
Object Group Objects
- Area Group Data Fields
- Link Group Data Fields
- Node Group Data Fields
- Pump Station Group Data Fields
- Reservoir Group Data Fields

