You cannot run a simulation on a network until the network has been successfully validated. At present, the example network has some required fields that are empty; these fields must be given values in order to be successfully validated so that the network can be used in a simulation.
The InfoWorks ICM Inference option provides a method for generating reasonable values where accurate data is not available. For example, ground levels can be interpolated from those of nearby nodes, and pipe widths can be inferred by looking at the pipes upstream and downstream.

This stage assumes that you have started InfoWorks ICM and that Master database, containing the ICM Basic Tutorial, is opened in the Explorer window, showing the 'Langley Catchment Study' model group.
To infer missing data:
-
Create a new user flag for inferred values named 'IF' and choose an unused colour such as bright blue.

- Open the 'Langley Inference (TUT)' network.
The 'Langley Inference (TUT)' network is now displayed in the GeoPlan window.
- Zoom in the zone in the north west area of the network and use the
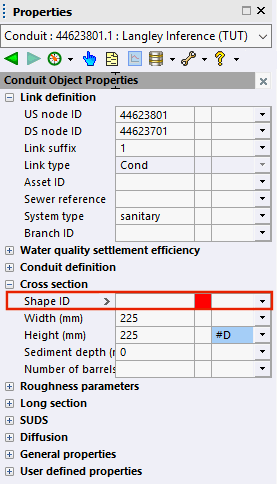
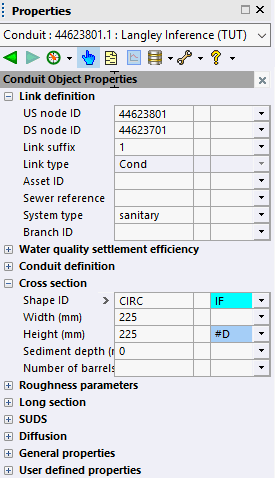
 (Properties) button to look at the properties of nodes 44623801, 44623701 and 44623604, as well as the related links (44623801.1 and 44623701.1). These objects have missing data; Ground levels for the nodes (in the Nodes location section of the property sheet) and Shape ID for the conduits (in the Cross section section of the property sheet).
- Fill the gaps in the data using inference:
- Clear any selection on the GeoPlan. Either click the
 (Clear selection) button from the toolbar or right-click the GeoPlan and select the Selection | Clear selection option from the pop-up menu.
 - Right-click the 'Inference Group' in the Explorer window and select New | Inference from the pop-up menu.
- Click OK to accept the default name, 'Inference'.
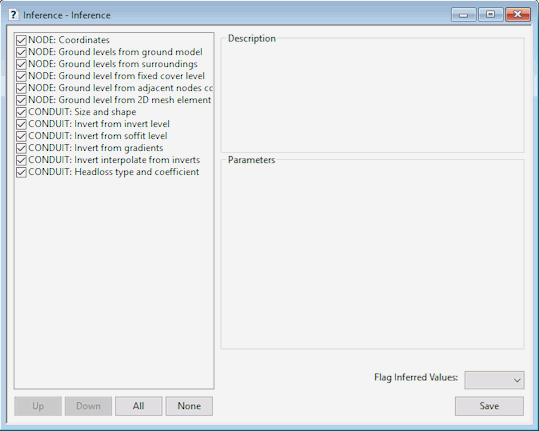
- Right-click the new 'Inference' object in the Explorer window and select Open from the pop-up menu. The Inference dialog is displayed, which lists the inference rules that can be applied to the network on the left side of the window. By default, all the rules are selected.
- Click the None button to de-select all the rules.
- Click any of the rules to see any relevant parameters for that rule.
- For Flag Inferred Values,
select IF from the drop-down list.
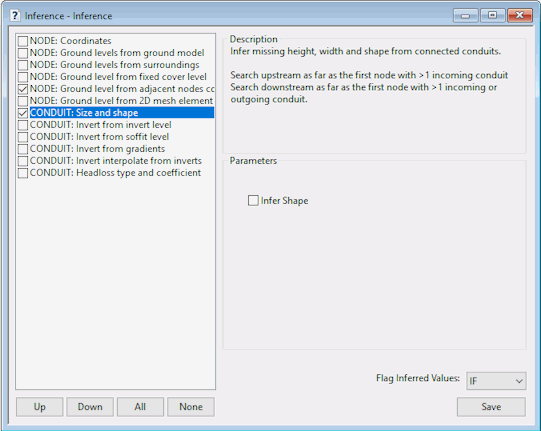
For the purpose of this tutorial, we are going to infer node ground levels from adjacent node covers and size and shape of conduits from connected conduits.
- Ensure that the NODE: Ground level from adjacent nodes covers and the CONDUIT: Shape and size are the only two check boxes selected.
- For the CONDUIT: Shape and size also ensure that you add a tick the Infer Shape box.
- Click Save to save the changes and then close the window.
- Drag the Inference object from the Explorer window onto the GeoPlan.
A message is displayed asking you if want inference to be applied to the whole network.
- Click Yes.
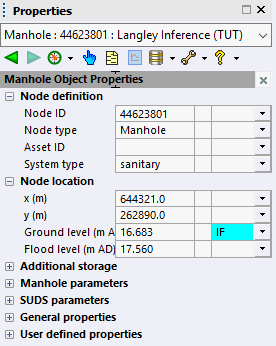
- Use the (Properties tool) to inspect the objects with inferred data. For example, display the Property Sheet for node '43623701. You can search for the node using the
 (Find in GeoPlan) tool.
Fields with inferred data have an 'IF' data flag and are coloured as set up in Step 1. For the example bright blue was the selected colour.
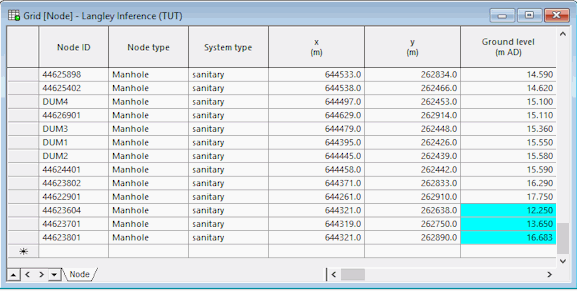
- Check the node data:
- Open the Nodes grid. Click the
 (New nodes window) button on the Modelling Grid Windows toolbar to display the
Nodes grid
(New nodes window) button on the Modelling Grid Windows toolbar to display the
Nodes grid - Sort the nodes by flag for the Ground Level column.
- Close the grid view. Click the
 button in the top right-hand corner of the window.
 - Check the Conduit data. For example, open the Property Sheet for link '44623801.1' and go to the Cross section section. You can search for the node using the (Find in GeoPlan) tool.
In the following example, fields with inferred data have an IF data flag and are coloured bright blue.
- Commit the changes to the network (no need to validate).
- Close the GeoPlan window. Click the button in the top right-hand corner of the window.
Once all required values have been filled in, a simulation can be run. However, it could be worth doing some extra validation to check that the network data is reasonable.
 Back to flowchart
