Validating across several fields within a report
Certain form controls have a ValidationRules property allowing users to set validation rules on them. These rules can be simple rules, used to compare the value of the corresponding report field to a specific value, but they can be more complex and involve validation across several fields within the report.
Validation rules are set up in the form:
- Open the form of interest.
- On the form layout, click on the control of interest to display its Property Box on the left side.
- Scroll to the ValidationRules property and click on the ellipsis button adjacent to it.
This opens the Validation Rules Editor.
- Set the Logical Operator appropriately (ALL or ANY) if required. This applies only if there is more than one validation rule.
- Set the Comparison Operator to the desired value. Available operators depend on the control type.
- Click the ellipsis button to display an editor that depends on the control type, where the date, time, value or string to compare to can be specified:
- Related Date Validation Editor and Related Time Validation Editor for Date and Time fields These fields can be compared to other fields of the same type, a specific date/time or the current date time. They can also have an offset applied as days, hours, minutes and seconds (for time).
- Numeric Validation Editor for numeric for.Numeric fields. Numeric fields can be compared directly to a value, a field or a formula in the same way that calculated values are implemented. See Calculated Value Editor for more information.
- Text Validation Editor for Text and combo box fields. This editor allows simple = or <> cases insensitive comparisons.
- Click OK to close the type-specific editor.
- Back in the Validation Rules Editor, type the message to be displayed when the validation rules are enforced in the Error message text box. See Important Note below.
- Click OK to save the changes and close the dialog or add more validation rules by clicking the
 button.
Important note
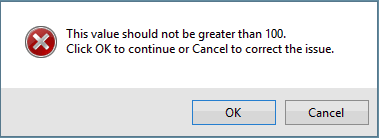
Validation rules are checked when the report is saved or completed completed, and can be tested against an unpublished form. Each rule is evaluated and, if it fails, a warning message is displayed, highlighting the offending field. ![]() Show image
Show image
The first line of this message is the text typed in the Error message box of the Validation Rules Editor. See above. The user then has the choice between continuing to save the report (OK) or cancel the save (Cancel) and correct the issue.
Example of cross field validation
Let us take the example of a manhole survey form for which the "sum of the chamber depth and shaft depth should not be greater than the manhole depth (Rim to Invert)" rule is to be enforced:
- Add the relevant controls (Chamber dimension, shaft depth and Rim to invert) to the form layout.
- Click the Rim to invert control so that the property box displays the properties for the control.
- Click the ellipsis button adjacent to the Validation Rules property.
The Validation Rules Editor is displayed.
- Click the ellipsis button of the dialog.
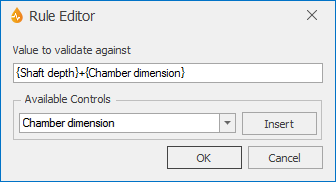
The Text Validation Editor is displayed.
- Select Shaft depth in the Available Controls dropdown list and click Insert to add it to the box at the top.
- In that box, place the cursor after {Shaft depth} and type in a + sign.
- Select Chamber dimension in the Available Controls dropdown list and click Insert.
The expression in the top box should now read {Shaft depth}+{Chamber dimension}.
 Show image
 - Click OK to close the Text Validation Editor.
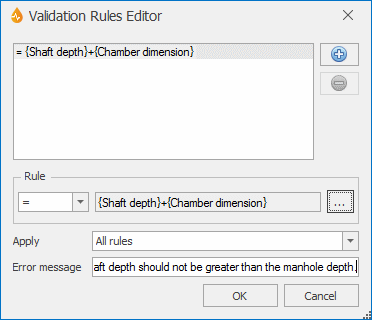
Back in the Validation Rules Editor, the Rules list should contain the expression as described previously.
- Set the Comparison Operator to ">"
- Type an error message into the Error message box.
 Show image
 - Click OK to commit the changes and close the dialog.
- Save the form.
The form can be tested as is or the application can be published first.
- Generate a report from the form.
- Fill in the report and test the rule by typing in a value for Rim to Invert that is smaller than the sum of the chamber dimension and the shaft depth values.
- Save or complete the report.
A message is displayed.
 Show image
 - Click OK to continue with the saving or completing procedure or Cancel to go back to the report and amend the values.


