Creating forms
Forms may be generated for any existing application. An Application may contain any number of forms, with data either relating to a specific type of InfoAsset Manager incident, survey, repair or test report, or unrelated to InfoAsset Manager in any way.
The main steps to form creation are described below. See also the practical examples (for InfoAsset Manager Collection and Distribution networks).
You can start with a blank form or a from a template.
To start with a blank form:
- On the Forms tab, in the Forms group, select New.
This opens the Form Designer.
- Above the toolbox, select Default (if not already selected).
Tip: If the Application platform and Form platform is set to All but you do not want to create an Android version of the Default form, then you can delete the Android version by right-clicking an object in the toolbox pane and selecting Delete Android form. You can also change the setting of the Platform property from All to Windows.
To start from a template:
- On the Forms tab, in the Forms group, select the dropdown arrow beneath the New command.
- Click Using Template.
This opens the New Form dialog.
- Select one of the templates from the dialog.
- Click OK.
You populate the form using items and controls from the Toolbox.
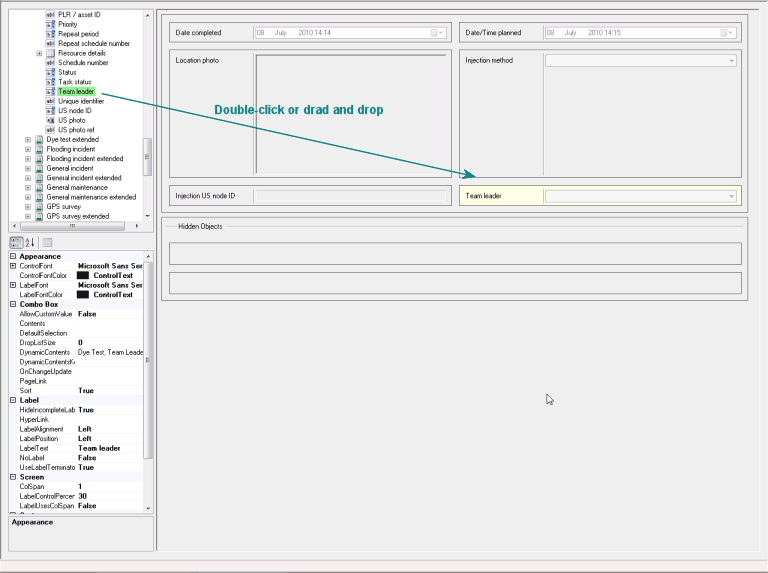
All controls/items can be added to the form by double-clicking them on the toolbox or by dragging and dropping them onto the layout area of the form.
Tip: Double-clicking an item/control adds the item/control to the next available space on the form layout, whereas dragging and dropping places the item/control in the desired slot.
If items are picked from the Collection, Distribution or Asset toolbox, there are some important rules to be aware of:
- Every item can be picked only once (only one occurrence of a field allowed on a form).
- Required or system items must be picked. These items are highlighted in red in the toolbox pane and they are object primary keys allowing InfoAsset Mobile to tie up with InfoAsset Manager.
- Items from different categories (Collection, Distribution and Asset) cannot be used in the same form.
- A form relates to a single InfoAsset Manager object, therefore CCTV Survey items cannot be put on the same form as, for example, Drain Test Survey items.
Once an item has been added to the form layout, it can be customised by left-clicking it. This activates the Property Box for that particular item. Parameters such as font size, font colour, label, the mandatory and the read-only properties of the item can be set there.
Note: Font colour and size are supported in most cases (see Property Box) but alternate font types are not.
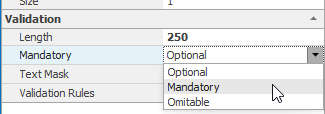
Amongst the properties, one of the most commonly used fields is Mandatory. This combo box allows the user, amongst other things, to mark the selected item as mandatory (select the Mandatory option). This means that the corresponding item must be filled in/checked/etc at report completion time. Such items are marked with a  on the resulting report. Mandatory items are different from required items, in that they are not system items and that they are made mandatory by the user and can relate to any field in the Form Designer. For example, a user-text field can be marked as mandatory.
Another commonly used property is ReadOnlyUserLevel, which can be configured to make fields in reports read-only for certain users. The default value for this property is None, indicating that the related field will not be read-only in reports.
Setting ReadOnlyUserLevel to one of the available user levels will make the field uneditable (disabled) to users at that level or below. This could potentially be a problem because it could be a field that is used by another field that is mandatory or part of the report title. That is why a warning is displayed the first time that the property is changed to a value other than None (it will not be shown on further changes to that control).
Double-clicking some items on the form layout displays further dialogs allowing further customisation. For example, you can specify the documents to attach for a Documents control or the image to use for the Logo control.
A form can be set as schedulable in the form Property Box (click on the form background). This is possible if the form contains one or more Date fields (for example, Date Planned, Date Resolved, Date Completed) and provided the application has been enabled for scheduling. See the Scheduling Tasks topic for further details.
If the form being created includes dynamic data that will not be required in the field because, for example, a report that is generated in the office will be sent out with that information already populated, or because the data set is very large and may cause performance and data issues, then InfoAsset Mobile enables optimisation of the dynamic data by allowing you to change the default combo box to a text box while maintaining links to the InfoAsset Manager object.
To use this feature:
- Drag a text box from the Toolbox and drop it on the applicable combo box.
A Replace or Change Type dialog is displayed.
- Click Change.
When the user in the field fills in the report generated from this form, that user will be able to type in the required data into a text box (rather than select it from a drop-down list). When the report is uploaded to the InfoAsset Manager database, the corresponding network object, which provided the dynamic data, will be updated accordingly.
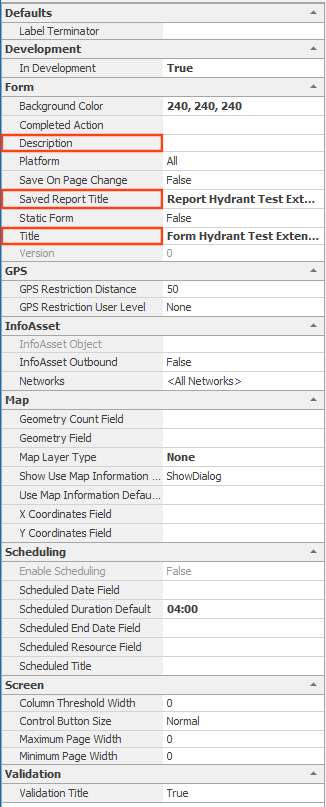
When all desired items have been added and customised, the information relating to the form itself and to any report using this form should be entered. These fields are optional but it is good practice to fill them in as they will help identify the form or the report. Left-click the form (make sure you do not click an item inside the form).
The following fields are the most commonly used:
- Title - form title
- Description - notes describing the form
- Saved Report Title - report title
This is how the report will appear in the Saved or Completed tabs once it has been generated. It is possible to set up dynamic report titles. See the two practical examples for an illustration (collection network and distribution network).
When you are happy with the form content, layout and configuration, the Default form can be saved. To save, select Save on the Form tab.
Depending on the options selected in the Editing subpage of the Options dialog, newly created forms may automatically be marked as In Development. At saving time, you are offered the options of keeping this status or clearing it. See About marking forms as In Development for more information.
- Above the toolbox, select Android.
- Use the Toolbox and Default Form toolbox to create the Android version of the Default form.
- Generic toolbox items such as labels, panels and page breaks can be used in the layout of the Android version of the form. No generic layout items, such as page breaks, from the Default form are automatically included in the Android form.
- The properties for the whole form, such as title, are common to both types of form as is any colour specified for the first page.
- Once an item is added to the Android form, the current properties on the Default form are used. Any subsequent changes made to an object in the Default form are not automatically added to the Android form, although they can be copied using the context menu item Update properties from Default form.
- Save the Android version of the Default form by selecting Save on the Form tab.
Note: Whatever In Development option was selected when the Default form was saved will also apply to the Android version of it.
At this stage, forms can be assessed, mainly to test inter-form functionality (for example, a form relating to smoke tests can "call", by means of a button control, a smoke test defect form) or communications and data transfer with InfoAsset Manager. For this, locally generate reports from these forms and mimic report filling.


