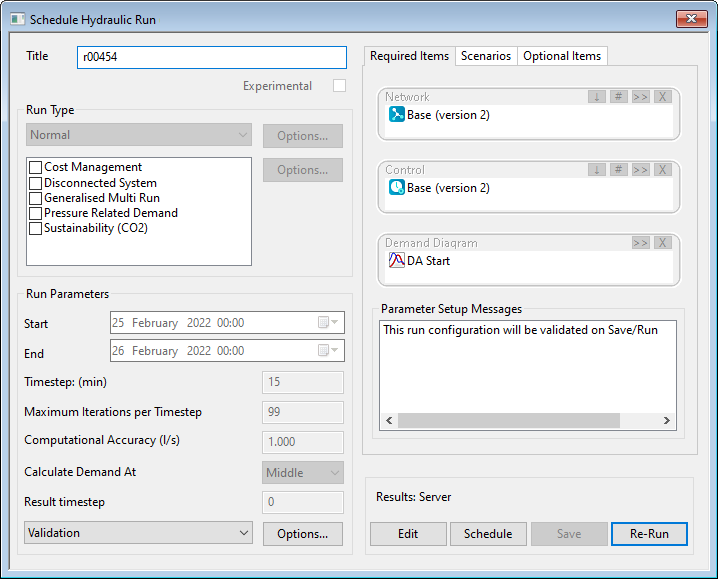
Schedule Hydraulic Run view
Use the Schedule Hydraulic Run view to set up and run InfoWorks WS Pro simulations.
Note:
The behaviour of the Schedule Hydraulic Run view has changed to improve the operation.
-
Starting version 2023.1, the parameter set up messages are not produced until Save or Run are clicked.
-
When a run produces results it becomes read only to preserve the integrity. In order to edit the run, click the Edit button and the run becomes editable, and it adds a ! in the run name. When you click Save, the new run will be saved in the Run group. If Experimental is set, then the Run dialog is editable.
The run information will be stored when the Save button is clicked, or after the simulations have been run by clicking the Run button.
Run information will be saved when simulations have been run, even if the simulations fail.
The dialog can be resized for convenience. It can be enlarged or maximized in which extra white space appears. You can also reduce the size of the dialog in which case scroll bars will appear. The size and layout of dialog components, such as buttons, does not change.
The Schedule Hydraulic Run view is opened from the Model Group window by:
- Right-clicking Run Group and selecting New | Run.
- Right-clicking an existing run and selecting Open.
| Dialog item | Description | ||||||||||||
|---|---|---|---|---|---|---|---|---|---|---|---|---|---|
| Title | A title for the run. If you do not enter a title, a title will be generated automatically. The software will not allow you to give the run the same name as an existing run in the database. | ||||||||||||
| Experimental |
You can check this box if you wish to make changes between runs and overwrite results from the previous run. If this box has been checked the simulation can be re-run with the same run title, even if parameters have been changed in the Schedule Hydraulic Run view. Once a simulation has been carried out with the box unchecked, configuration management is enforced. If any changes are made to parameters in the Schedule Hydraulic Run view, the results must be saved to a different file (that is, a new run title must be specified). You can use the facilities in results management to delete unwanted data. |
||||||||||||
|
Run Type |
|
||||||||||||
| Run Parameters |
|
||||||||||||
|
Run Parameters Options |
|
||||||||||||
|
Required Items |
Items that are required to run a simulation: You can add items by dragging and dropping them from the Model Group window or
Explorer window onto the appropriate box, or by clicking the If the merge method of version control is being used, the If you have previously defined this run using version controlled objects and are now reusing it, an update button with a red outline will appear if a later version of an object is available. Clicking this button will replace the version currently shown in the box with the latest version. To clear a selection, click the |
||||||||||||
| Scenarios |
Choose the scenarios that you want to run by selecting the check box. Notes:
When scenarios are selected for simulation, they will appear in the job grids and the explorer tree. Multiple scenarios can only be used in Normal Hydraulic runs or Water Quality runs. For Fire Flow and Critical Link Analysis, you can only select one scenario for the simulation. In the Explorer tree, the run can be opened to show a simulation result for each scenario. Scenario names are used as a prefix in the simulation name. |
||||||||||||
|
Optional Items |
Items that can be optionally added to the run:
You can add items by dragging and dropping them from the Model Group window or
Explorer window onto the appropriate box, or by clicking the If the merge method of version control is being used, the If you have previously defined this run using version controlled objects and are now reusing it, an update button with a red outline will appear if a later version of an object is available. Clicking this button will replace the version currently shown in the box with the latest version. Clicking the |
||||||||||||
|
Parameter Setup Messages |
Message box displaying run validation error and warning messages. |
||||||||||||
| Results | Shows Local or Server, depending on how the Store results (set in new runs) option has been set in the Schedule Run(s) dialog (opened by pressing the Schedule Run button). | ||||||||||||
| Edit |
When clicked, the run becomes editable, and it adds a ! in the run name. When you click Save, the new run will be saved in the Run group. |
||||||||||||
| Schedule |
Opens the Schedule Run(s) dialog. |
||||||||||||
| Save | Saves the information in this view without running a simulation. | ||||||||||||
| Run or Re‑Run |
Enabled when current settings in the run view are valid. Runs the simulation. |

 (Browse) button
and selecting the item from the displayed tree. (By default, only appropriate items are shown in the tree, but you may have to expand the parent object folder to see them.)
  (Version) button appears when you add a version controlled object to the box. Clicking this button opens the
  (Delete selection) button.